Showing posts with label recipes. Show all posts

Wednesday, December 19, 2012

Tostones de Pana

Mama was NOT really cutting
Pana.  I love pana.  Before I came to live here in Puerto Rico, I had never tasted nor even seen a pana.  Pana, also known as breadfruit, is commonly eaten boiled and paired with algo guisado [something stewed] or cut into cubes, lightly fried, smashed, and then fried again [like tostones].  Today's cooking lesson will show you the latter...both super duper easy AND TASTY! [The other way, you simply boil with salt to taste for about 20 minutes]
How to cut/cook pana [in pictures]:

Step 1: slice in half
Step 2: Slice like you would a cantaloupe
Step 3: Peel the skin

Step 4: Cut into cubes

Step 5: Place in bowl with water and salt to taste

Step 6: Heat oil and fry until lightly golden

Step 7: Place on flat surface [my neighbor uses a plastic bag, I don't know how I feel about that]

Step 8: Squash the pana down

Step 9: Open & refry for a few minutes 

Step 10: Voila!
I hope you enjoy this recipe as much as I do.  It has been quite a journey thus far with Mama and her one arm and a more detailed blog highlighting those adventures is on the way.  Until then, though, I cook, and make lemonade out of lemons [or tostones out of pana].

Friday, April 1, 2011

Pescado Escabeche

Ok I heart escabeche...pretty much anything that you can make escabeche (pickled)...guineos (green bananas), guineo con molleja (green bananas with chicken gizzards), pulpo (octopus), and pescado (fish)...I love!  So, one day, during one of our many trips to Sam's we spotted 
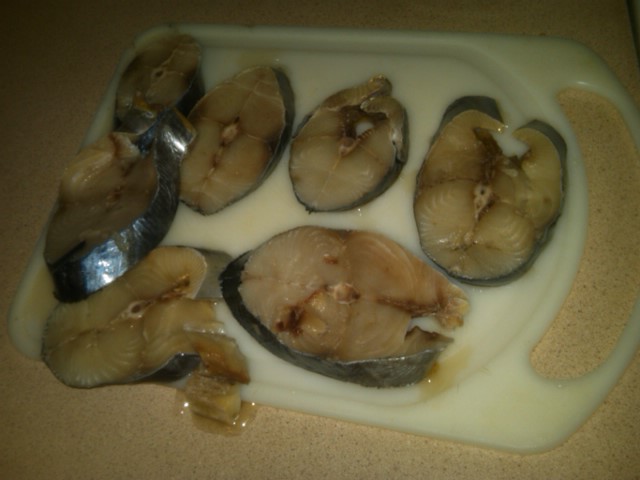
corvines en ruedas (corvine fish rounds).  I told Mama how much I love that fish escabeche and immediately, she picked them up and said, "I'm going to teach you how to make this."  I was elated!  As you know, my joy is not only mine alone...it is now yours...enjoy!

The fish!
                    Ingredients:                       
Corvine Fish Rounds                  Adobo
Minced Garlic                          
Corn Oil (for frying)
Olive Oil (1/2 cup)
Vinegar (1/2 cup)
Onions
Olives
Bay Leaves


First step is to make sure that the fish pieces aren't too wet.  Mama covers them top to bottom with hand towels while she gets the rest of her ingredients together.
Covered fish!
Once the fish is less moist (that's what she said...LOL), you sprinkle some Adobo on the pieces and then spread a hearty amount of minced garlic on the fish...enough to coat it.   Mama likes using her (clean) hands to really get the garlic in there!
Minced Garlic
Mama gets her hands dirty!


Adobo
Have your skillet heated with oil, ready for frying and one by one put those babies in.  Be careful not to over fry them...the fish should still be soft and not overcooked.  I made that mistake only because I really enjoy crunchy fish.  The gambler came over to eat and made sure to tell me that while it was a great meal, I did overcook the fish LOL.  Mama didn't appreciate her commentary and told her I did it on purpose (with a semi threatening tone).  I told the gambler I appreciated her suggestion and would definitely try to cook the fish less next time.  Then I gave Mama a 'chill out' look and she walked away and got lost in her word search book within minutes.
Fry time!
Getting them crunchy LOL


While the fish is frying you can start to prepare your escabeche portion of this dish.   First step, cut up a few onions (depending on how much you like onions depends on how many you use).  I think I used about 1 and a half onions.
Onion rings!
Then you add a half cup of olive oil and a half cup of vinegar to the onions.

After that, you throw in the olives and a few fresh bay leaves.

Remember to keep an eye on that fish frying!  As for the escabeche, you should try to use a bowl that you can put a flame to because....well you now put it on the stove on low heat and let the flavors simmer together.  Every now and then you sauté the mixture until you feel the onions get softer.
Stirring, stirring!
Once the fish have all been fried and the escabeche has become one in the bowl, you combine the two!  Add whatever starch or veggie or both you'd like and you have a full meal!  Mama says to get the optimum flavor, you let the fish sit in the escabeche for quite awhile before you serve it...sometimes even overnight.  I, of course, couldn't wait and it was still delicious!  Enjoy folks!
I told you I like the fish crispy LOL!

Wednesday, February 9, 2011

Gingambo con Pechuga de Pollo (Okra with Chicken Breast)

Alright folks, its now almost dinner time!  Here is a recipe for Gingambo con Pechuga de Pollo (Okra with Chicken Breast).  Please note that okra naturally has a slimy texture so, if that will bother you, this is not the dish for you.  But, remember, okra is really good for you, so if you can try it, please do!
Chicken isn’t the only protein you can cook this with.  You can use bacalao (cod fish), chicken pieces, red meat, pork or other vegetables (should you want to a vegetarian dish). 

Materials:
Pot
Okra
Chicken Cutlets
Sazon con Achiote
Oil
Olives
Water
Sofrito

Step 1
Wash the okra and the chicken (separately).
You should wash the okra ahead of time so it has time to dry.
Cuttin' the chicken!
Cut the chicken into cubes

Step 2
Place the chicken in the pot with a medium flame
Place 2 tablespoons of oil in the pot and let simmer for about 2 minutes

Step 3
Place 1 tablespoon of sofrito in the pot raise flame to medium high
Add in about 2 or 3 spoonfuls of spanish olives
Add a half a packet of Sazon con achiote (to add color)
Add in one cup of water
Stir, cover pot and let cook
 
Step 4
Cuttin' the okra!
While the chicken is cooking, begin to cut the okra
Cut off the heads of the okra and then proceed to slice them into medium sized pieces.  (you should get about 4 to 7 slices per piece of okra)

Step 5
Throw your cut okra into the pot with the chicken (by this time the chicken should be fully cooked).
Cover the pot and let cook until the okra is soft.  Should be about 5-10 minutes depending on how much okra you use.

Almost ready!


Serve with starch (almedon) of your choice! 

We ate it with rice, beans and tostones!
Cooking with Mama is always fun, but sometimes we have some language hiccups as you'll see in the following video...enjoy!


¡Avena!

Alright folks, I hear many of you are freezing and sick and tired of snow.  No fear little icicles!  Here's something to brighten your cold and gloomy day as one of the benefits of cold weather is the opportunity to make yummy, warm, and comforting dishes!  Here's one straight from Mama's kitchen!  It's called Avena, which is basically oatmeal, but its Puerto Rican style...and its done with sabor (flavor)!  ¡Disfrute! (Enjoy!)

Pot (Casserola)
Avena
Splenda
Vanilla Extract
Cinnamon (Canela)
Milk
and
Water


This recipe serves about 2 heaping bowls (but can feed up to 3 or 4 depending on how hungry you are)

Step 1
In a pot combine:
4 spoons  of Avena
1 cup of milk
1 cup of water
*If you like your oatmeal dense lessen the water/milk, if you like it watery, add more*
1 packet of Splenda (or 1 tspn of sugar of your choice)
Mix with a spoon

Step 2
Stir in a tablespoon of vanilla extract (Mama prefers white vanilla over the dark kind)
Add in a tablespoon of  Cinnamon
Mix again with a spoon

Step 3
Place pot on the stove and cook it on a medium flame
Let it cook for 2 or 3 minutes
Turn off the flame and stir
Let it sit for about 2 minutes and serve!
Sprinkle some Cinnamon on top for flare and enjoy!


Breakfast is served!

Tuesday, January 18, 2011

Your Poor Husband!

"Aye, your poor husband!"  That’s all grandma says every time her and I are in a kitchen together.  Now, if I wasn’t the descendant of two cookin’ grandmas, a cookin’ mom, a cookin’ pops, a cookin’ Titi (aunt) and cookin’ Tios (uncles) I would probably be a bit concerned by grandma’s playful yet ominous words.  But, instead I tell her “Well teach me then!”
Now, while I'm sure I can learn how to really kill the kitchen, I don’t know if you can teach someone how to grab hot objects with their bare hands as she does…I’m thinking that skill is honed over time (and after your nerve endings decide to just give up I’m sure).  She is one of three older women I know who scoff at the use of an oven mitt and laugh in the face of fresh-out-the-pot boiled eggs.  I am amazed every time and every time she looks at my “amazed face” and repeats those three precious words “Your poor husband…”

So in an effort to not have this future “poor husband” of mine have such a pitiful wife, Mama decided to teach me how to make what is often referred to as “dirty rice” (not here apparently since Mama looked at me like I was crazy when I said “Oh, arroz sucio.”), or white rice cooked with black beans.  And, so, because I don’t want any one else’s husband (or future husband) to be referred to as “that poor guy”, I am sharing her recipe with the masses.  OH and please note that Mama, like most O.G.C.’s (Original Gangsta Chefs), doesn’t measure anything.  So, don’t come here looking for exact recipes…I’ll try to be as descriptive as possible with her ‘eye measurements’.  Also Mama is very much against adding salt to food (and yet it still always tastes great) and the beans we purchased had sofrito already in them…which means you may need to add seasoning according to your preference but I’d suggest trying it this way first.  Enjoy…

Step 1
-       Get a nice iron rice pot (Imusa tends to be the brand we Ricans favor)
-       Put a little cooking oil in to coat the bottom
-      High flame


Step 2
-      -  Put a large spoonful (or 2) of sofrito into the pot (if you can get sofrito from someone who makes if fresh then do so..if not, then resort to store brand)
-       - Throw a cube of chicken stock & a packet of Sazon into the pot


Step 3
-       Wash the rice
-       I guess you use about 2 cups (I think my mom taught me that 1 cup usually feeds two people)


Step 4
-       Throw the washed rice into the pot and mix everything together


Step 5
-       Throw in your can of black beans and mix
-       Add enough water to cover the top of the rice


Step 6
-       Cover the pot with its top and leave the flame on high/med high until most of the water has evaporated


Step 7
-       Once most of the water has evaporated, stir the rice and cover it with aluminum foil
-       Lower the flame and put the pot top back on the pot


-       After about 20 – 25 minutes, you have a tasty pot of rice (and according to Mama, a lucky husband)!